...of a forgotten blog.
Ok, so I am probably the worst blogger in the world.. I promised to post every update, every change, every nook and cranny of our new house, and here we are almost a year later after my last post without so much as a hello or a happy new year.. tsk, tsk.
I mean it's just one year, right? Well a lot has happened in that one year that I'm thinking of changing this blog's direction all together from just house updates (let's face it, once the housework and renos are done, the small talk gets a little awkward) to just life updates.. because I'm sure everyone is just on the edge of their seats, waiting to find out what is going on with our lives, right??
Ha, well.. This last week had me thinking that I needed this blog after all. To moan, to cry, to celebrate even if no one is reading. Whether it's about flooding in our basement or welcoming a new baby or facing new challenges, it's good to get it out (and your friends can really only hear so much)
So what had me thinking about all these things and posting again after a whole year of blog silence?? It pains me to write this, but our sweet little Olive, our three year old baby girl, was recently diagnosed with Type 1 Diabetes (T1D) and after the shitstorm of the ICU and the overwhelming influx of information thrown at us within a few days, I just needed a sounding board that didn't judge or made me feel like I was burdening them with the sadness that I was feeling even when you are, as a parent, expected to put on a brave face, or just one that really didn't talk back. So put it on a blog (ha).... Crazy, right? but just maybe there is someone out there feeling the same way, going through the same thing, or someone that just knows exactly what to say or not say.
I started this blog originally with the hopes of documenting our "new" house journey (so we can look back and say "oh hey, I remember that crappy old wallpaper!"), but also with the hope of rejoicing in fixing something that just needed some TLC. Little did I know that this blog, I'm hoping, can serve as something that we can look back on and see our little life's journey and rejoice in the success of surviving it!
So I guess the posts will be when the mood strikes.. I know there's been many times when I almost became that person on Facebook that just word vomits their entire feelings on their status only to find myself erasing the whole thing (because I personally get irked by those kinds of posts on fb). This way, I can still get the benefit of the word vomit, but at the same time never feel like I'm force feeding said feelings to entire group of fb friends and family (both close and casual ones), and I'm thinking if you've read this far down into this post already, you weren't bored by my musings.
I won't promise any more posts of updates, I've learned my lesson (and I really did for some reason feel bad for those empty promises) So I guess I'll just say thanks for reading and until next time.

home. life. love. unscripted.
Thursday, May 1, 2014
Friday, June 21, 2013
Fireplace/Mantel Makeover
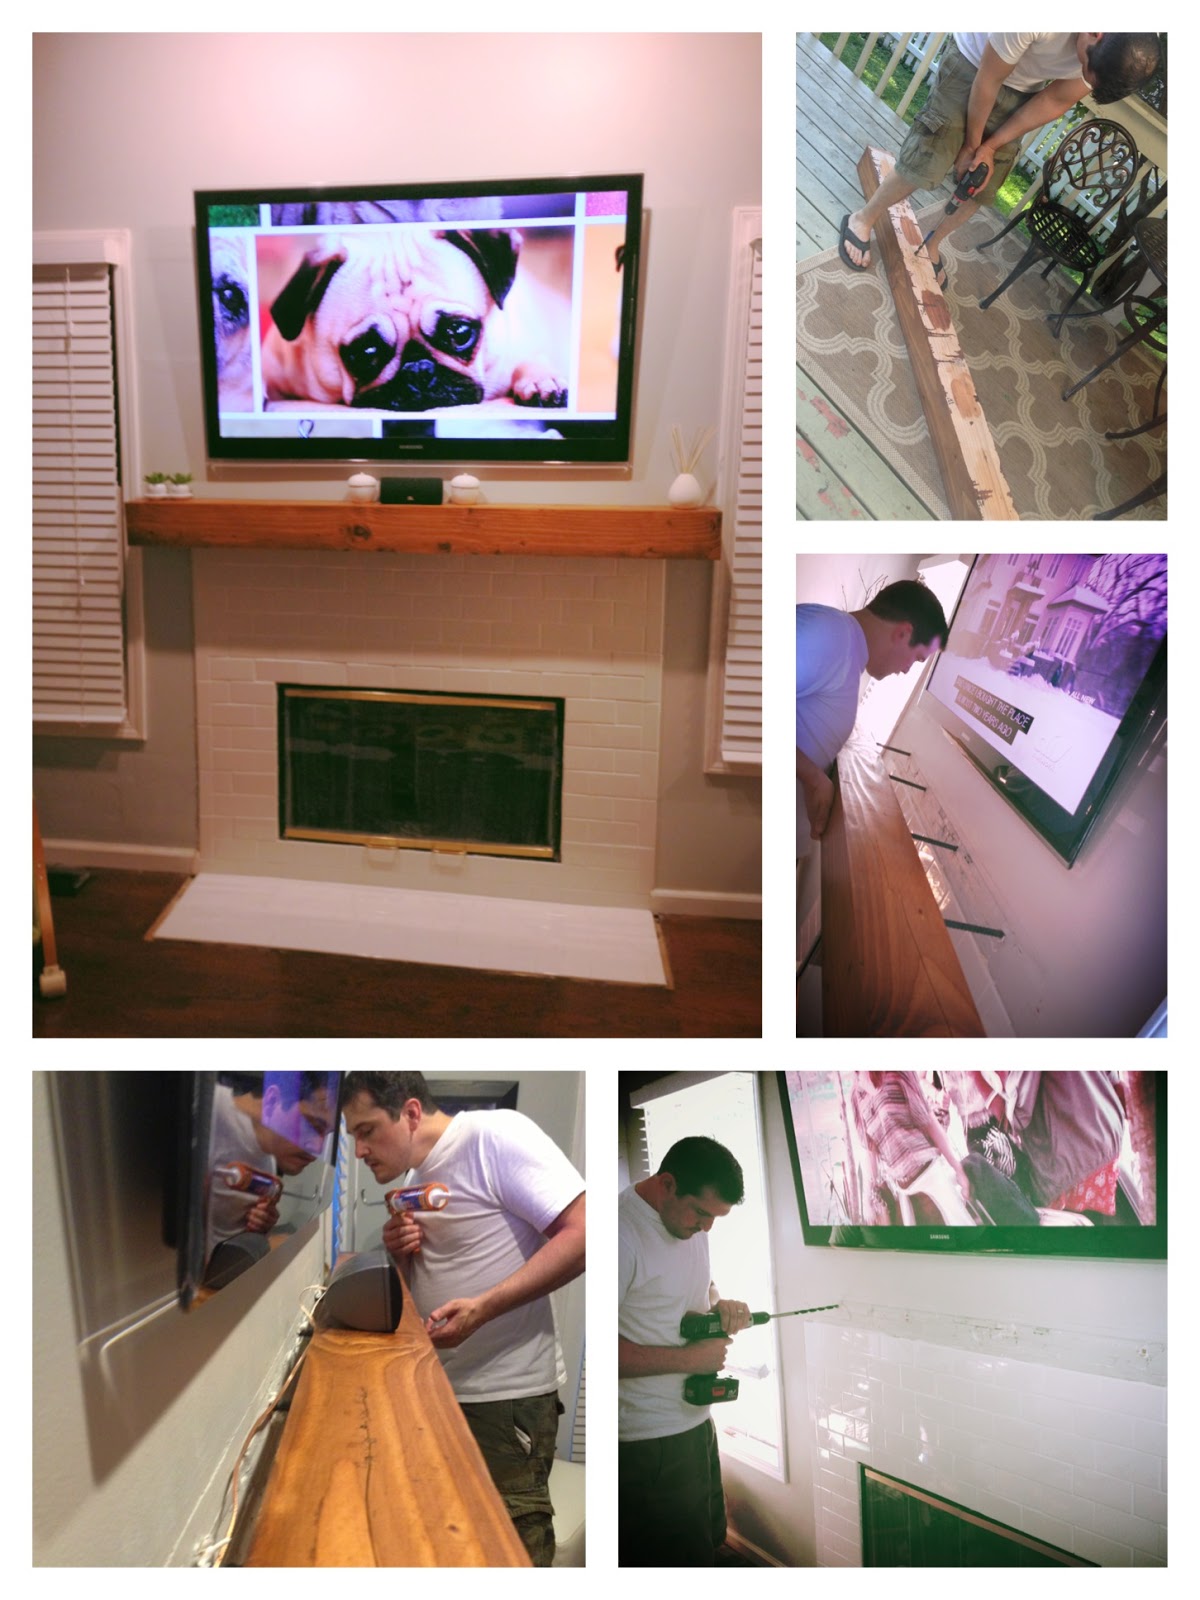 |
| Look at the cute puppy eyes.. aww |
I should emphasize MAN in mantel, because there hasn't been a project so far that my husband, Steve, felt more manly about... but I digress..
 So after having to stare at one of these work in progress projects (left) for the last few months, we finally installed a nicely stained mantel beam above our fireplace -- the same fireplace with a subway surround that I sweated and toiled over, btw.
Of course, there was a series of projects before we could even really attempt to put it up ourselves (electrical, paint, and finding the right beam). We originally thought we'd go with a reclaimed barn wood from a seller we found on craigslist (apparently this guy bought a barn just south of Chicago and was selling all of the wood beams). Which would have been pretty cool actually, but in the end, we just went with old reliable Menard's and got a nice Douglas Fir beam from their lumber stock. Total convenience factor won out on our end.
Anyway, before we could even put it up, I should mention our re-tiling project as well. Although that project isn't quite as fresh in my memory anymore (I had to start the hearth before we even had the floors refinished), but the pictures kind of jog my memory. I should also mention that re-tiling the fireplace surround had to be done since the old tiles were pretty badly stained and cracked. And we were just so enamored over classic white subway tiles (i.e. our whole kitchen is in white subway tiles), that it only made sense to match it up.
Anyhoo, here are some "work in progress" photos...


Not only was this an easy enough project, but it was easy on the budget too (about $35 per 12.5 sq ft) and we mixed our own thin set (which I totally recommend over getting pre-mixed thinset, from experience). The project was simple enough that we were able to finish tiling the fireplace surround and the kitchen backsplash in a weekend #weekendwarriors. We did leave the grouting for another weekend, but I recommend mixing your own grout as well to get the consistency that you like (pre-mixed was so hard to work with, in my opinion.)
 |
| Classic white daltile 3"x6" Ceramic tiles (approx. $35 per 12.5 sq ft!) |
 |
| just say NO to Pre-Mixed anything.. |

Anyway, on to the MANtel.. We picked up a few stain samples (10 cents for a small packet at your local hardware store) and decided to go with a medium Golden Mahogany. Totally inspired by these rustic pinterest mantels below:


Then we pondered and thought long and hard about installing this over the fireplace. Naturally, I lost sleep over how the mantel would stay up and even had a few nightmares of everything just falling apart. In the end, we decided to go the rebar method and drilling through 4 studs on the wall. My inner skeptic was on alert, after all this beam was not light and I kept imagining every possible scenario where the wall caving in. But I had to trust my man, so off we went.

 |
| Rebars secured. You can even see our stain samples here. |
 Not only was this part tricky, it was also not fun. So as I helped my hubby hold up this super heavy beam while he hammered it in with a heavy duty mallet (I recommend cushioning your hold of the mantel with a pillow or blanket so you won't feel the stinging reverb everytime it was pounded in). Like I said, it wasn't fun. There were a few times we were both convinced that it wasn't going in at all, enough to discourage us. But after taking a break, we mustered up a bit more confidence and pounded away. Sure enough, after awhile, the rebar was finally getting through the stud and moving along. And bonus part, the hammering also gave the beam an old beaten up, maybe even hand hewn effect. Huzzah!
Before you know the mantel slid right in. And just before securing it completely against the wall, we just wanted to add some extra hold (for our peace of mind) and added construction grade adhesive to the wall and mantel.
 |
BAM, mantel is in!!
|
BEFORE:

AFTER:


I love it! (Also love that all the hanging wires from the mounted TV and speakers are hidden as well).
Aside from the kitchen, this is probably one of my favorite projects. Not only does it give the room a nice rustic look with a touch of modern, but I am super excited to hang up stockings over the fireplace over the fireplace (this is our first fireplace, after all)
Have you guys attempted installing a DIY beam as a mantel before? How was your experience?
Monday, June 10, 2013
House updates!
In order to unload all of these images off of my computer, I decided to post a picture-heavy house update post and I can take this giant picture monkey off my back. I would have wanted to go into more detail with each project, but who really wants to hear me blabber on when pictures speak louder than words.. So without further ado...
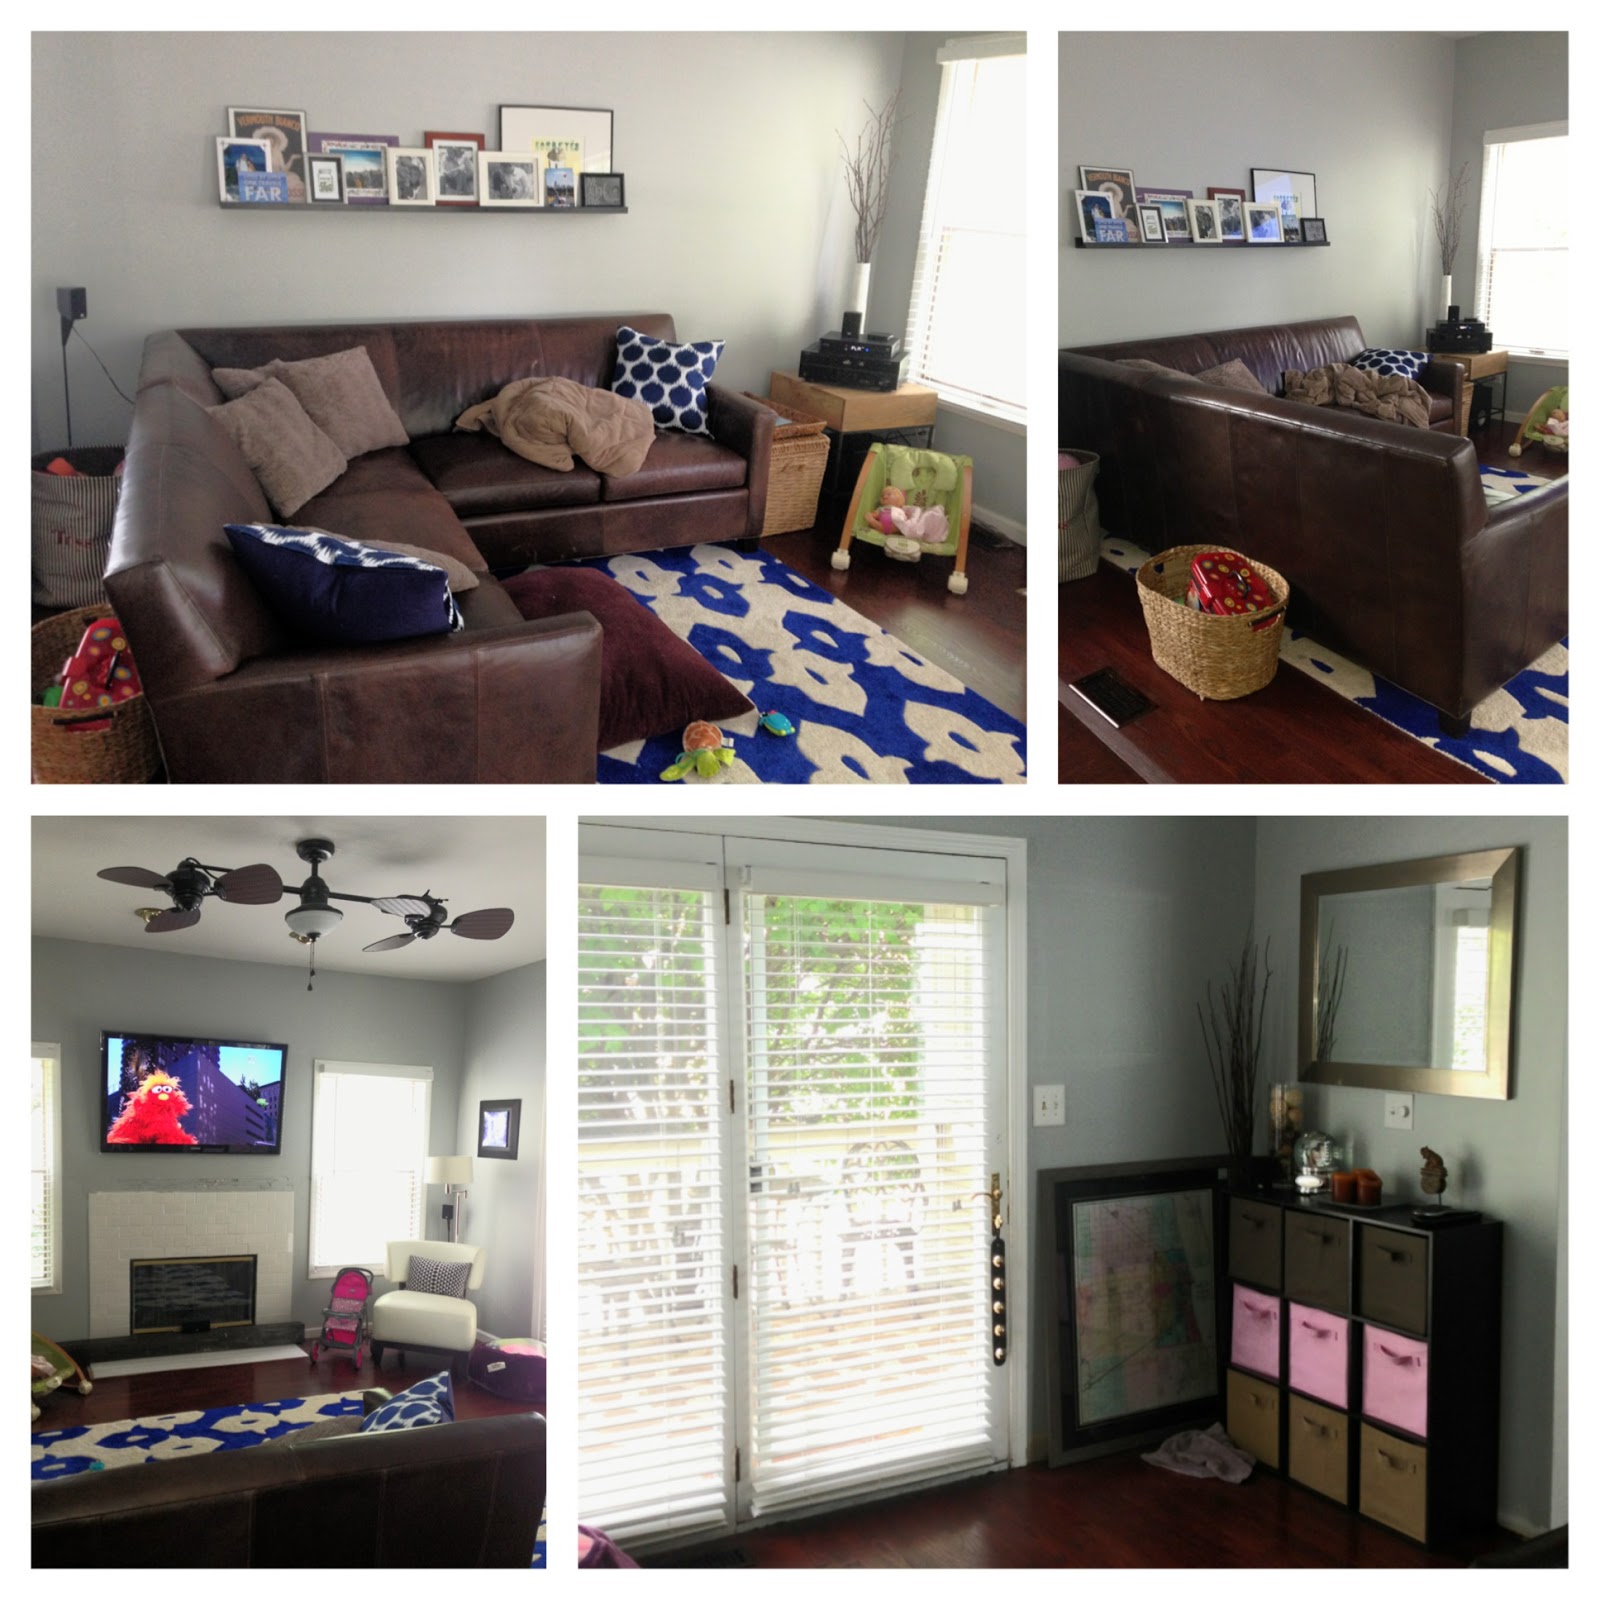
Family Room:

Firstly, the couch is a HUGE improvement from our 2 camping chairs setup from before.. and much more comfortable. Believe it or not, this was not our first couch purchase for this room. We actually purchased a sectional online because we were having such a hard time finding a sectional that would fit well in this room that wasn't overstuffed or overly large! And after convincing ourselves that there is nothing out there, we searched online without the "butt" test (where we go to a showroom and park ourselves to test is comfy factor). We were that desperate. After pulling the trigger, we were informed shortly that the couch was backordered and wouldn't come until about a month later. So we waited.. and waited. And as luck would have it, the very same day we were informed that the couch was arriving (with assembly and all), my dear husband spots our current, beautiful, most perfect of all perfect couches at the Crate and Barrel outlet as he was picking up our dining room chandelier that I ordered online. Oh cruel fates..
But we did not hesitate, even though it was too late to return the other couch, we bought before it was gone and now we are the current owners of 2 perfectly good couches. BTW, if you are in the market for a brand new sectional sleeper sofa, check this out! (please) https://post.craigslist.org/manage/3820779195
Anyway, one of the other most important improvement here is something you can't see. We've had an electrician run wires from our wall hanging tv inside the wall, so no more dangerous hanging cords everywhere. Other than that, we've painted added an accent chair, picture ledge (in progress), and other accessories. Still a work in progress, but I'll leave that for another post.
p.s. one of my other fave finds is the west elm side table housing our entertainment equipment. I say favorite, of course, because of how much of a bargain it was. West elm in oak brook, IL was having a moving sale marking everything in the store down to a whopping 60% off.. Needless to say, I went nuts)
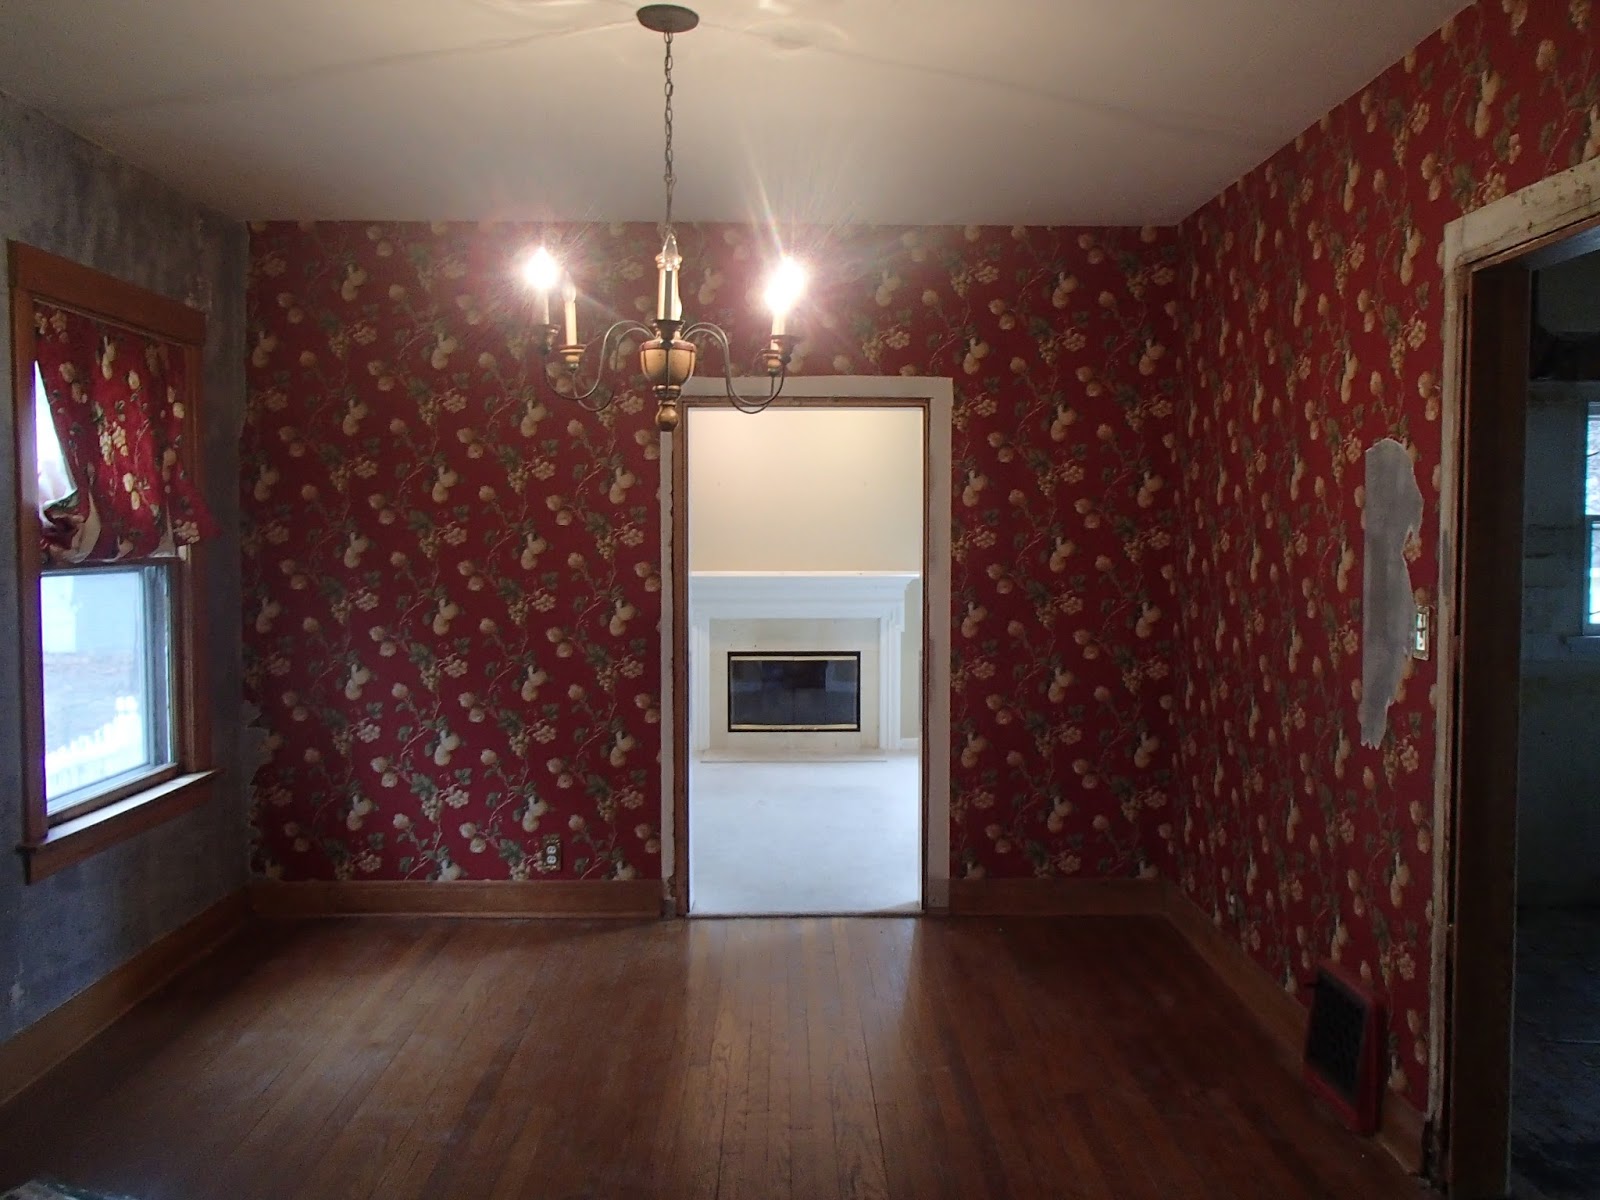
Dining Room:
 Pardon the mess, I decided to run around the house and take quick pics of every room just before posting (some of my other stored photos weren't quite as current). But here you'll see we've added a new rug and the crazy spider looking chandelier is finally gone, replaced with a nice clean rectangular drum chandelier from Crate and Barrel (on sale! woohoo)
Foyer/Front entrance:
 Here's another one of my favorite transformations. I have to admit, I was a little stumped with what to do with our foyer, going from hunting for a teeny, narrow foyer table and mirror combo, to building a shelf. But in the end, I love that I found this coat hook/narrow shelf at Homegoods and was able to hang my Chicago print above it. Add a few accessories (tiny candle, fake succulent), and voila! Also, another fave accesory from west elm, my new corner umbrella stand/bucket vase. (again, 60% off..)
Oh, in the corner of the first landing, I used a plant stand to accent an apothecary vase with some accessories inside. And we hung up some baby photos of Olive heading up the staircase.
Front Room:

Kitchen:


The kitchen, of course, is my absolute favorite room and transformation (I know, they're all my favorites), but I hang out here more often now that we have countertops, cabinets, and appliances.
And with the addition of that peninsula, I do a lot of work (and blogging as we speak) here. I am centrally located with the family room to my left and in full view of my toddler. And just about every part of this renovation: from the cabinets (which turned out beautifully for a DIY install), our beautiful new appliances, farmhouse sink and industrial fixtures (not to mention, running water), and our glorious quartz countertop, it truly has become my nice, white, dream kitchen. I really should go into more detail about it, but I'll leave that to another post (I have tons of in progress photos, hate to have let that go to waste..)


Slowly a work in progress. We've moved our man cave appropriate leather sectional and our old entertainment center setup from the old house here, and boy, does it look much better down here. And I have to say, I am in love with all these built in bookshelves. Currently housing all of our books, DVDs/CDs, Olive's toys, and even my scrapbooking stuff (yes, I had a scrapbooking phase). But I am most excited about how easily I can access all of this stuff, hopefully making me more productive in the future and getting more projects done. We also added a little locker system at the bottom of the steps, adding an Ikea shoe cabinet and mirror combo, and a locker/hall tree with 2 separate areas for the two kiddos. I picture them getting home from school, running down to the basement to hang their book bags, coats, sports equipment, etc. and putting shoes away neatly. A girl can dream.
Office:

So this is my tiny little office/dungeon, where I isolate myself for hours on end especially around deadlines. I actually like the coziness, which helps me focus and get sh*t done, but my favorite of course is the addition of my uber fast new iMac. For a designer, this is a godsend (Adobe CS6 runs like a dream on it! no more loooong rendering wait times which makes me want to bash my head on my glass desk. ouch.) and worth mentioning is the wonderful built in speakers --it actually sounds pretty good. So when I have to buckle down on those late nights designing, I play some Pandora, light a fragrant candle, and I swear my creative juices just start flowing.
Master Bedroom:


Ok, so this was the other room that we weren't planning on finishing up for awhile since it is the 2nd biggest room on the 2nd floor, it housed all second floor moving boxes for the longest time. But with guests coming to stay the night, we just had to make it somewhat decent for now. So at the moment, it is a multi-functional room with our old trundle bed and Olive's toys (very convenient for when I have to get some work done in the office just down the hall). But I know that we're going to have to work on this sooner or later, especially with baby no. 2 coming just around the corner, Olive's room will have to be the nursery and she'll be moving here before we know it. Oy vey.. no rest for the weary.
Olive's room/nursery:

 This room hasn't had too many transformations other than moving in Olive's stuff. But what's most impressive about this room is her closet, I have to say. For a century old house, it manages to hold most of her stuff and keep it organized. But it is a tiny room, so we can only do so much. Eventually, we plan to paint and neutralize the pink (which Olive loves), but we need to get it ready for baby no. 2. We're going to go with neutral shades of course, so it can also be the guest room even further down the road and maybe have Olive and baby no. 2 cozy up in the 2nd (larger) bedroom.
Outdoors misc.
 Ok, so at this point of this post, I am bunching up all outdoor related updates.. Which isn't much.. yet. We need to get the whole house repainted, new gutters, fix up the yard, and power wash. Lots in the works, but we are just taking our sweet time. But I did have to at least post a pic of our new bistro set in the upper deck (which is a perfect little spot for sipping coffee/tea in the morning/reading the paper, and the swing in the front porch --which I've always dreamed of having).
In a nutshell... we have done a lot, but we still have tons to do. Not only the fun aesthetic stuff, but the icky construction stuff that you don't get to see (i.e. a biblical flood came to Wheaton not too long ago and flooded our basement. not so fun, but we need to get some sort of water sump pump, flood prevention system.. )
So if you've read this far down, thank you for sticking around. Hopefully, I haven't bored you to death.
Until the next post.. Now go outside and enjoy summer!
Family Room:
But we did not hesitate, even though it was too late to return the other couch, we bought before it was gone and now we are the current owners of 2 perfectly good couches. BTW, if you are in the market for a brand new sectional sleeper sofa, check this out! (please) https://post.craigslist.org/manage/3820779195
Anyway, one of the other most important improvement here is something you can't see. We've had an electrician run wires from our wall hanging tv inside the wall, so no more dangerous hanging cords everywhere. Other than that, we've painted added an accent chair, picture ledge (in progress), and other accessories. Still a work in progress, but I'll leave that for another post.
p.s. one of my other fave finds is the west elm side table housing our entertainment equipment. I say favorite, of course, because of how much of a bargain it was. West elm in oak brook, IL was having a moving sale marking everything in the store down to a whopping 60% off.. Needless to say, I went nuts)
Dining Room:

Foyer/Front entrance:

Oh, in the corner of the first landing, I used a plant stand to accent an apothecary vase with some accessories inside. And we hung up some baby photos of Olive heading up the staircase.
Front Room:

Now this room, we hadn't planned on finishing off for awhile since it wasn't being used very often and for the longest time, this room was our storage for all the boxes from moving. But because I am in full on nesting mode, we got around to it much quicker than I thought. We added this couch/sleeper and used our old coffee and side tables, a graphic ikea rug and before you know it, it was starting to look like an actual room. I found this great mirror at Homegoods to add another entry room vignette in the corner and for Mother's Day, my dear husband fulfilled my dream of owning my very own piano :) LOVE! (I used to play, but I am more excited to see my little toddler, Olive, tickling the ivories)
Kitchen:


The kitchen, of course, is my absolute favorite room and transformation (I know, they're all my favorites), but I hang out here more often now that we have countertops, cabinets, and appliances.
And with the addition of that peninsula, I do a lot of work (and blogging as we speak) here. I am centrally located with the family room to my left and in full view of my toddler. And just about every part of this renovation: from the cabinets (which turned out beautifully for a DIY install), our beautiful new appliances, farmhouse sink and industrial fixtures (not to mention, running water), and our glorious quartz countertop, it truly has become my nice, white, dream kitchen. I really should go into more detail about it, but I'll leave that to another post (I have tons of in progress photos, hate to have let that go to waste..)
Basement:


Slowly a work in progress. We've moved our man cave appropriate leather sectional and our old entertainment center setup from the old house here, and boy, does it look much better down here. And I have to say, I am in love with all these built in bookshelves. Currently housing all of our books, DVDs/CDs, Olive's toys, and even my scrapbooking stuff (yes, I had a scrapbooking phase). But I am most excited about how easily I can access all of this stuff, hopefully making me more productive in the future and getting more projects done. We also added a little locker system at the bottom of the steps, adding an Ikea shoe cabinet and mirror combo, and a locker/hall tree with 2 separate areas for the two kiddos. I picture them getting home from school, running down to the basement to hang their book bags, coats, sports equipment, etc. and putting shoes away neatly. A girl can dream.
Office:

Master Bedroom:


OK, very much a work in progress here. I hate to say it, not much "remodeling" magic happens here. But we managed to situate our bed in the middle at least and found some nice, functioning side tables for each of our sides (Steve has a simple nightstand while I have a whole vanity setup on my side) But painting is hopefully in the works in the near future and we are currently gearing up the far side of the room for a temporary newborn station (pack and play, rocking chair, etc.)
We are still working on getting the closet/dresser/entertainment built in (at the foot of the bed), but at least we've had the electrician come in and wire said closet so we are just that much closer to getting it done. Worth mentioning in the room is my cool new stand up mirror/jewelry armoire. I am a baubles hoarder, so this was oh so nice. I actually find myself accessorizing more often now and looking halfway put together when I go out, if I do say so myself. (it's the little things). Also worth mentioning is our awesome new giant round mirror with capiz shells that I found on craigslist. Gotta love craigslist!
Anyway, more on this room later when it starts looking like a room..
2nd Bedroom/Guest room/Playroom:

Ok, so this was the other room that we weren't planning on finishing up for awhile since it is the 2nd biggest room on the 2nd floor, it housed all second floor moving boxes for the longest time. But with guests coming to stay the night, we just had to make it somewhat decent for now. So at the moment, it is a multi-functional room with our old trundle bed and Olive's toys (very convenient for when I have to get some work done in the office just down the hall). But I know that we're going to have to work on this sooner or later, especially with baby no. 2 coming just around the corner, Olive's room will have to be the nursery and she'll be moving here before we know it. Oy vey.. no rest for the weary.
Olive's room/nursery:


Outdoors misc.

In a nutshell... we have done a lot, but we still have tons to do. Not only the fun aesthetic stuff, but the icky construction stuff that you don't get to see (i.e. a biblical flood came to Wheaton not too long ago and flooded our basement. not so fun, but we need to get some sort of water sump pump, flood prevention system.. )
So if you've read this far down, thank you for sticking around. Hopefully, I haven't bored you to death.
Until the next post.. Now go outside and enjoy summer!
Beyond measure: Giant ruler growth chart
I have been a very bad blogger. Very bad indeed.. beyond measure (1).
Not only did I promise multiple posts about all the wonderful going ons in our new house, I have also not blogged a lick in a few months time. But life happens, what else can I say?
Well, I guess I will make no more promises and just blog when the mood strikes to lessen the pressure (pressure I created on myself, of course) The overwhelming amount of pictures I take of projects makes me less apt to post anything, strange enough.. all the organizing of photos, uploading.. Ain't nobody got time for that!
But I started this blog because I wanted to have some sort of journal to remember our progress and remember our house roots. So I guess I'm not quite willing to abandon that yet, so here we are. (ahhh, too much sharing of feelings for a Monday morning... I apologize ..beyond measure (2))
Anyway, speaking of measures, I thought I'd post about a fun little pinterest project that I took on over the weekend. I've been in constant search for a cute growth chart for the kiddos since they are growing so fast. I searched online for something that is ready to purchase without having much luck with something that satisfies my inner interior decorating diva, so I looked to pinterest for some "pinspiration" (har, har). Long story short, I found this..


 The rest was pretty easy. 2 coats of spray paint later, I had this! (ok so my numbers aren't exactly a replica of a ruler starting at 2ft. But I wanted to make sure that I can hang it about 2 ft. off the ground and my original trim wasn't very long, so..)
 Of course, now we just needed those essential ruler tick marks. I took my shiny black sharpie and started varying ticks (long ones reaching out to the number marks and smaller ones in between.)
Et Voila! Giant ruler growth chart!

This project took approx. half an hour, so it was very easy. If I were to use new wood from the hardware store, I probably would pick up some stain as well which would add to my total time, but since the trim already had a nice color to it, I decided to keep it that way.
OH I also forgot to mention, I would also suggest getting some picture hangers for the back of this and it shall be ready to hang.
I love how it turned out and love even more that this project was quick and easy on the budget.
I can't wait to start marking this up with the kiddos names and ages as they sprout up. Best part is, if we ever decide to move, we can easily pack this up with us vs. marking the walls with all these essential measurements.
Not only did I promise multiple posts about all the wonderful going ons in our new house, I have also not blogged a lick in a few months time. But life happens, what else can I say?
Well, I guess I will make no more promises and just blog when the mood strikes to lessen the pressure (pressure I created on myself, of course) The overwhelming amount of pictures I take of projects makes me less apt to post anything, strange enough.. all the organizing of photos, uploading.. Ain't nobody got time for that!
But I started this blog because I wanted to have some sort of journal to remember our progress and remember our house roots. So I guess I'm not quite willing to abandon that yet, so here we are. (ahhh, too much sharing of feelings for a Monday morning... I apologize ..beyond measure (2))
Anyway, speaking of measures, I thought I'd post about a fun little pinterest project that I took on over the weekend. I've been in constant search for a cute growth chart for the kiddos since they are growing so fast. I searched online for something that is ready to purchase without having much luck with something that satisfies my inner interior decorating diva, so I looked to pinterest for some "pinspiration" (har, har). Long story short, I found this..
I mean.. how CUTE is that!
So I set off to make my own. And as an added bonus, I just realized how much wood trim we had left over from our recent remodeling -- Wood trim that was original to the house! Repurpose and a little bit of historical interest.. Score!
Off to the hardware store I went to pick up a can of black paint and some pre-made stencils. I actually wanted to find a similar serif number font as my pinspiration photo, but convenience got the best of me and got construction looking stencils instead. no biggie.
I also pulled out a black sharpie and a measuring tape and started making temporary tick marks with a pencil and taped down my stencils at the appropriate measures. Easy peasy.
Then I realized that I picked up spray paint and thought the spray overage factor vs. stencil area was too high, so I decided to look for something to prevent this. So I found some cardboard, cut a hole just big enough to reveal the numbered stencil but small enough to make sure that I wouldn't spray past the edges of the stencil.


 The rest was pretty easy. 2 coats of spray paint later, I had this! (ok so my numbers aren't exactly a replica of a ruler starting at 2ft. But I wanted to make sure that I can hang it about 2 ft. off the ground and my original trim wasn't very long, so..)
 Of course, now we just needed those essential ruler tick marks. I took my shiny black sharpie and started varying ticks (long ones reaching out to the number marks and smaller ones in between.)
Et Voila! Giant ruler growth chart!

This project took approx. half an hour, so it was very easy. If I were to use new wood from the hardware store, I probably would pick up some stain as well which would add to my total time, but since the trim already had a nice color to it, I decided to keep it that way.
OH I also forgot to mention, I would also suggest getting some picture hangers for the back of this and it shall be ready to hang.
I love how it turned out and love even more that this project was quick and easy on the budget.
I can't wait to start marking this up with the kiddos names and ages as they sprout up. Best part is, if we ever decide to move, we can easily pack this up with us vs. marking the walls with all these essential measurements.
What have you guys used to measure your kids' heights? Any other cool pinterest pinspirations out there?
Sunday, March 10, 2013
Floored.
 |
| Wow factor. |
Quite possibly the biggest transformation to the new house to date was the refinishing of our floors. Someone (a floor guy) actually told us that it couldn't be done, but here we are with floors all shiny and new looking thanks to our brave refinisher guy.
 |
| Just say no.... to parquet. |
 Let's start with why/how the floors scared off some folks. I have to admit, the task was daunting, in the kitchen at least. Not only are we dealing with century old flooring, but it was covered in adhesive after we uncovered the original wood under some ugly parquet and vinyl flooring. (Ok, parquet is not for us, sorry if you have it!) BUT in my book, original (maple) floors always wins, hands down.
So who was the brave young soul to win the job?? Michael from J&M Building Maintenance Inc., Hardwood Floor Specialists. He came highly recommended by one of our contractors, and he did not disappoint. He is just starting out with his own company, but has been in the business for awhile mostly working with a bigger company and with lots of experience refinishing old gym floors (that's a lot of floors). I'd say that Mike's off to a good start.
 Our chosen floor guy did not shy away from all that scary, uneven, hard decades old adhesive covered floor, instead telling us about how he's seen and worked on worse (surprisingly, that made me feel so much better). But this was still no easy task, he promptly informed us after the fact that he went through tons and tons of sandpaper just to smooth out the floor. Thanks Mike, you are our hero!
He even weaved in new maple flooring in the areas where the wood looked like it was suffering from severe water damage. (dark corner covered in dust, right pic) All is well.
 First day, he came with his floor weaver pro and a licensed electrician (all of this hardcore equipment required hardcore electrical work, apparently), so all in all 3 guys working on the house the first day.
We decided to go ahead and do the second floor as well (minus the bathroom and the master bedroom) just because A) he was giving us a good, solid quote for both the first and second floor combo and B) we would never ever be able to get it done in the future, no matter how much we convinced ourselves that we would (especially with 2 little tater tots running around).
 |
| view from front room, to the dining room, to the family room (carpeted) |
But, aside from the carpeted family room addition, it was mostly original, and it needed love (especially the kitchen). We have 4 different species of wood throughout the house now (which is pretty cool, if you think about it): Maple in the Kitchen, white oak in the front/dining room, we added red oak in the family room, and pine floors upstairs. It's like a tree-loving hippie's nightmare, but it's being repurposed and giving it a new life, so simmer down now..

 Unfortunately, the family room threw us a curve ball as we realized that the subfloor underneath the carpet was much too high to be weaved in to the white oak in the dining room. BUMMER! So we had to decide on a transition piece between the rooms..
  |
| new red oak for the family room |
We went with a slight leader instead of a T transition piece. And since the floor joists underneath in the new addition ran parallel to the floors in the dining room, we ended up running the wood perpendicular to the wood in the dining room. We might as well make the room a whole departure from the rest of the house, so instead of matching the white oak, we went with red oak on the floors. Why not?
Here are a few more before shots of the rest of the floors:
Old carpet on stairs, revealed hardwood underneath, and pine flooring at the top landing (covered in icky carpet tape)


 |
| nursery |
 |
| 2nd bedroom |
 |
| office |
 |
| 1st floor hallway |
 Fast forward to 2 days later, the floors are sanded and pretty (and had that new wood smell to it, ahhh).. It was a gorgeous sight, oh the possibilities.
Mike and his crew did a a technique they liked to call "water popping" before adding stain. It was basically wiping the unfinished floors down with water to open up its pores and take in the dark stain much better. Good idea.
Side note: the other floor guy (who shall not be named) also said that dark stain was going to be hard to do on our floors and would not take well. Boo on you, other floor guy!
So the choice was ours (according to our actual floor guy, the sky is the limit), and we wanted dark floors to contrast our uber white kitchen (dark floors, light walls.. it's our color scheme). And after seeing the beautiful unfinished floors, it was hard to go dark.. but we did anyways. For a second though, I thought about just slapping on some clear varnish and calling it a day (plus it would have showed the natural colors of the wood).. but it's not like we had hickory or rare wood or anything like that, so on with the staining.
Anyway, we chose our stain and we liked the one on the left (and maybe the one with the hint of red on the right)

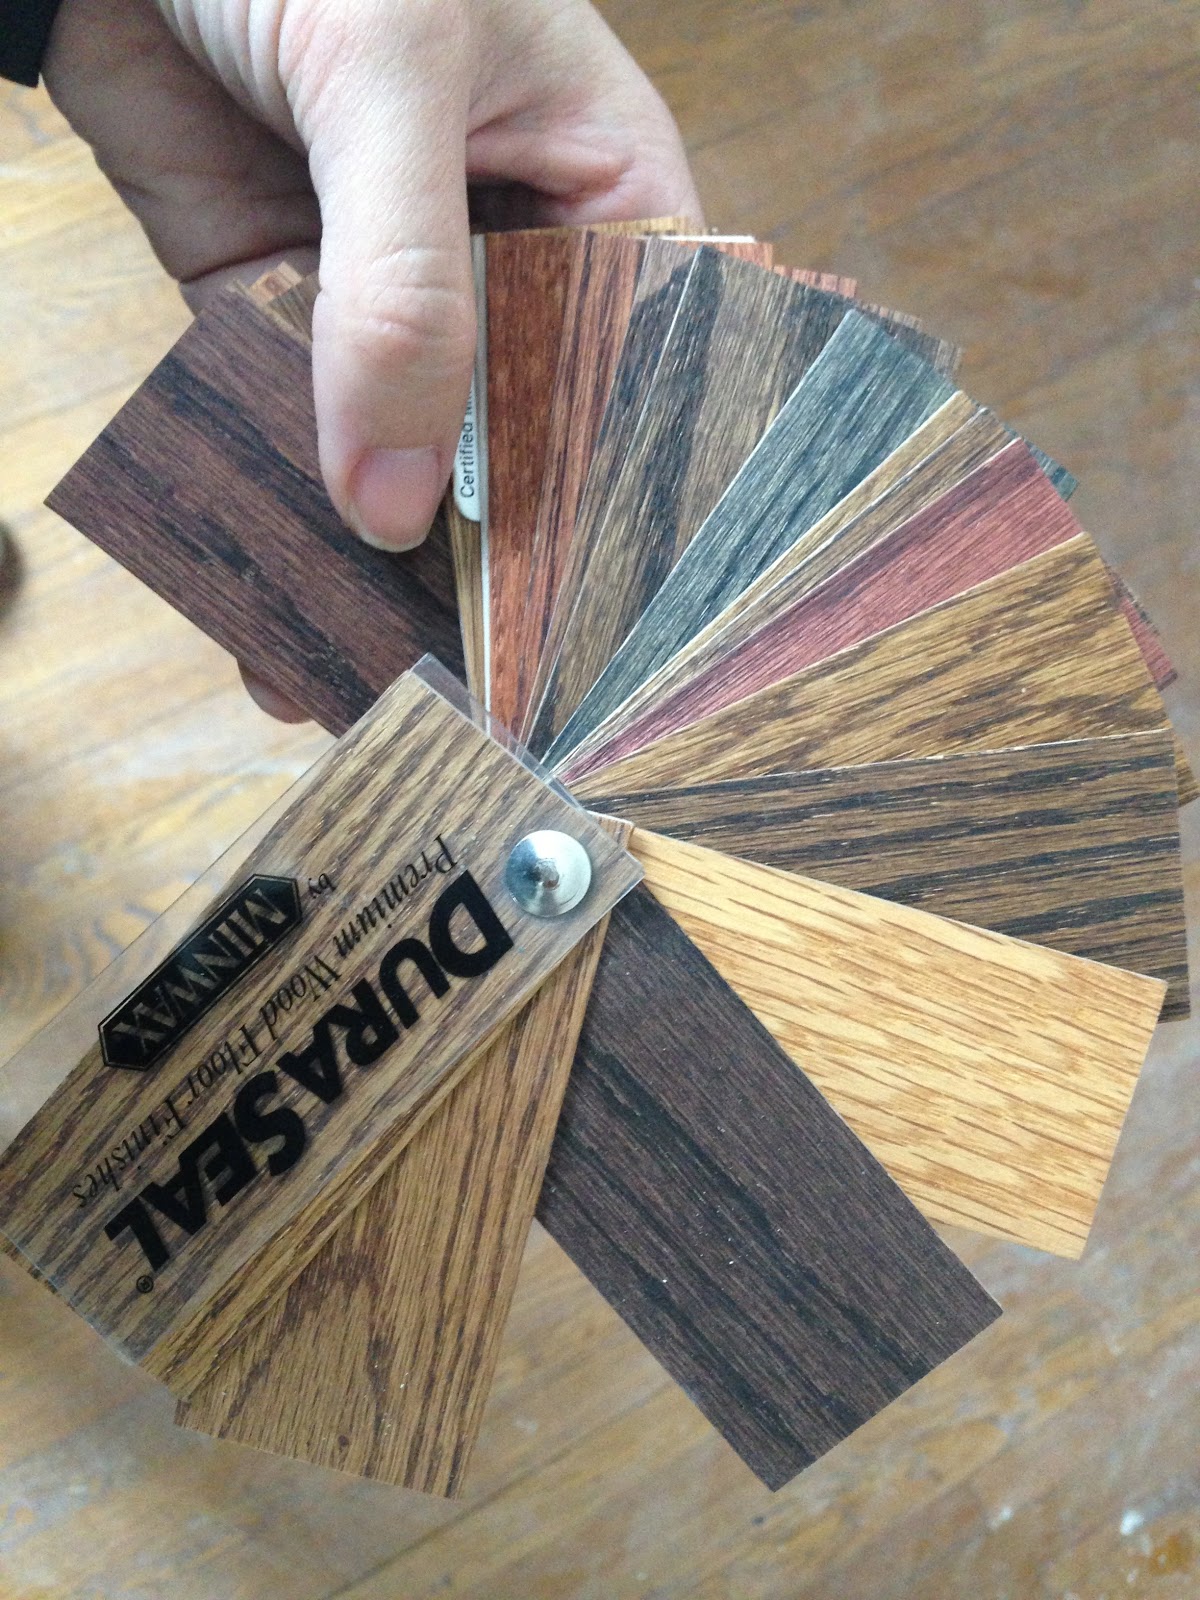
And not to say that my floor guy was without his flaws, he gave me these choices below, both a bit more red than I'd like. Rosewood on the left and Dark Mahogany on the right. He asked us to trust him, so why not now.

We chose Rosewood because it seemed less red (Mike, the floor guy, said it has a more purple undertone than red). Here it is stained without the clear coat, looking good so far..

Here it is with a new coat of polyurethane (still wet)

And the beautiful finished floors.. TA DA.. I am so *ahem* floored with the results! It all turned out so beautiful.. and shiny.. and even the hint of purple/red warmed up the cool grey paint in the walls (yellow kitchen wallpaper is gone, btw, replaced by more grey).

And that problematic kitchen?? Solved.

And the new red oak in the family room.. just gorgeous (accented by our new ikat rug). Don't you just love love love it?? (ha, ok I do)

After about a week's worth of work the entire house had new looking, beautiful floors and we couldn't be more thrilled. That varnish smell did linger for a few days (we scheduled our big move a week later), but in a week's time the house just smelled new and refreshed and less like a vat of poly. And of course, other downsides were sawdust in every crevice, in every piece of furniture, clothing, and even inside closets (so much for moving some stuff early). But that just required elbow grease and a groupon for a cleaning service in the future. Also, one other big bummer, since the staining required getting under the shoe base moldings, Mike removed and replaced those pre/post stain. Which was great, but we are left with chipping paint throughout the whole house. Nothing a little paint touch up can't fix, but still.. (hem and haw)
And this was the project that completed the house before move in. Of course, we would have rather finished the kitchen and every other odds and ends throughout the house, but we gotta move in sometime! This was just enough so that we can live while working in the house. OH Joy!
How do you guys feel about dark stained floors? (shows too much dirt for your taste?) Anyone think the parquet should have stayed?? just kidding
If you guys want to read the rest of this *exciting* remodeling series, CLICK HERE!
Subscribe to:
Posts (Atom)